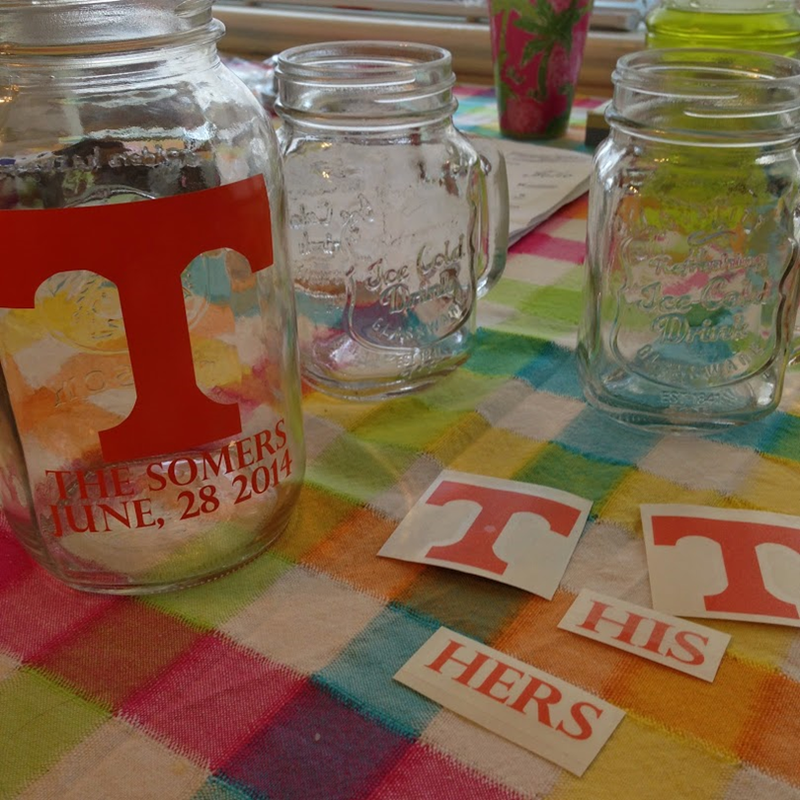
As I mentioned in my post on Monday, I made an adorable wedding present for my friends. They are huge Tennessee fans (thus the Tennessee orange color in the wedding) as well as a couple who love to tailgate for just about everything. Since they already bought a house together a while ago they didn't really have a wedding registry, so I decided to get a little creative (surprised?) with their wedding gift: A Mason jar Bar Set. The great part is that this is a great idea to make for anyone for a wedding present, house warming present, or birthday present. Here is how you can make your own mason jar bar set. MaterialsDirections - I first measured out the size on the glass for the vinyl decals. Next I created a design of what I was looking for on my computer to give me a better visual of what I was looking to make. I then contacted my favorite vinyl decal girl, Ali from Ali Cat Alley, to order my custom designed decals.
- Once my decals arrived I added them to my jars. Since these were a wedding present I chose to do a "His" and "Hers" on the drinking glasses but you could easily do a school logo, monogram or just a design like polka dots.
- Once I had the decals on I switched out the normal mason jar lids for the shaker top and straw set.
- And now I have an adorable, custom made mason jar bar set!
| |
What easy DIY craft ideas have you made from mason jars? Be sure to share you creations below!
xoxo
Megan
You might also like...
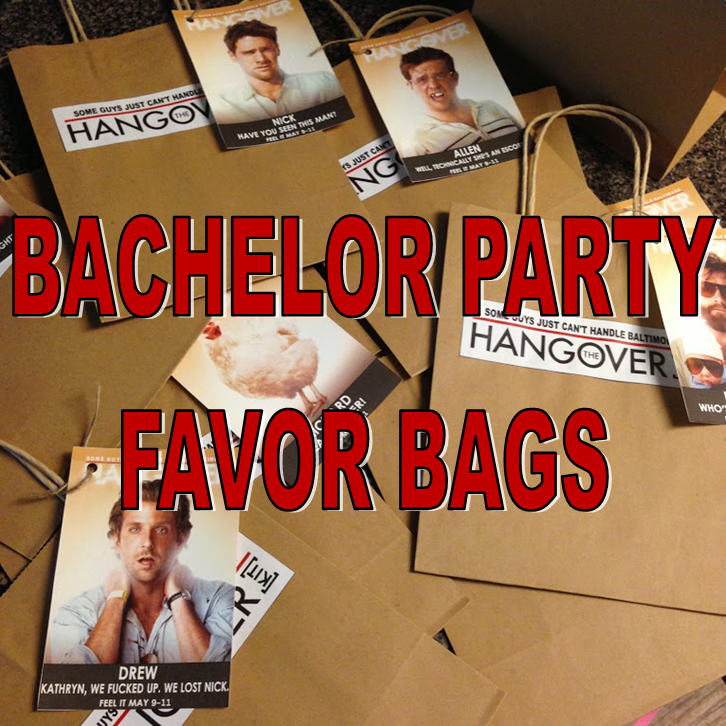
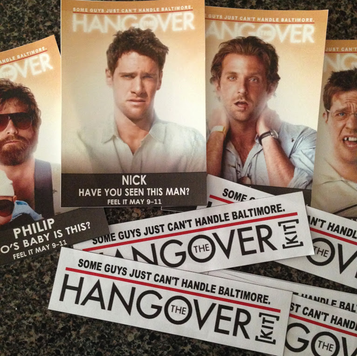
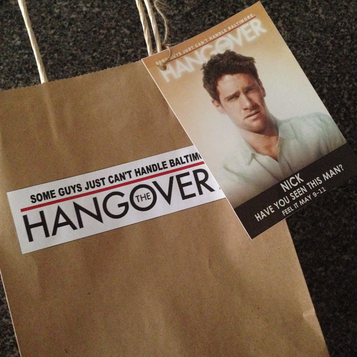
A few weeks ago one of my friends came to me for help. He was attending a bachelor party for one of his college buddies and wanted to put together a favor bag for all the attendees and wanted to know if I had any ideas. Now, I have helped organize, plan and run most every aspect of a wedding but never thought I would ever need to help with a bachelor party. So after talking with my friend about what they would be doing (general plans only lol) I took to Pinterest to see what I could come up with that stayed within the budget and that the guys would all get a kick out of. There are a number of great ideas but my favorite were these Hangover Kit bags from blogger He Asked. I Said Yes. They were really easy to make and all the guys loved them at the bachelor party! Here is how you can make your own Hangover Kit bags... Materials- brown paper bags
- twine
- hole punch
- glue
- scissors
- customized tags
Instructions1. I took each poster image from The Hangover's IMBD page, imported it into Publisher and then added my own customized touches. I also created the bag labels using Publisher. Here were some of my finalized tags. 2. Next I glued the bag labels on and tied on each person's customized tab to the handle with the twine. 3. After all the bags were put together they were ready to be filled. Some great items that you could include are mini water bottles, mini Gatorade bottles, aspirin, gum or mints, airplane bottles, cigars, plastic sunglasses, tums and any other trinkets that relate to the weekend festivities. You could turn your bags into pre or post hangover bags - or both!
What other great Bachelor Party favor ideas have made or seen?
xoxo
Megan
You might also like...
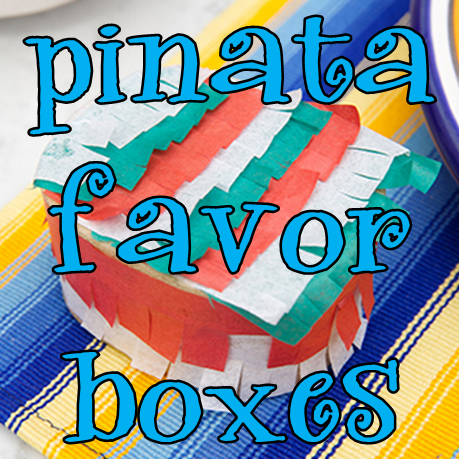
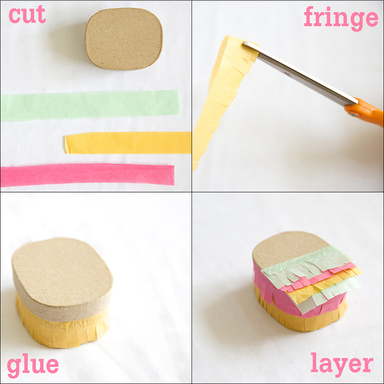
Some of you may recall that this past Halloween I made my very own pinata costume. While I will not be pulling the costume back out for Cinco de Mayo on Monday (yes I still have it in my closet...it took way too long to make for me to just throw it away!), making the pinata dress had inspired me to track down some more pinata craft ideas for the upcoming fiesta celebrations. Here is one great party favor idea you can make for all your guests... Pinata Favor Boxes from blogger Ilana SaulYou will need: - mini cardboard or papier-mâché gift boxes
- crepe paper or tissue paper in multiple colors
- glue
- scissors
Instructions - Cut long, one-inch wide strips out of your paper.
- Take each strip, and using your scissors, cut fringe into one side of the strip.
- Line up the bottom of your fringe with the bottom edge of your box and glue. You only need a little bit of glue to get your paper to stick.
- Continuing to work from the bottom up, in alternating colors, layering as you go.
- Fill your boxes with party favors, like bright colored candies, nail polish, lip gloss or mini tequila bottles, and get ready to put a smile on all your guests’ faces! Just be careful that they don't walk away with multiple pinata party boxes!
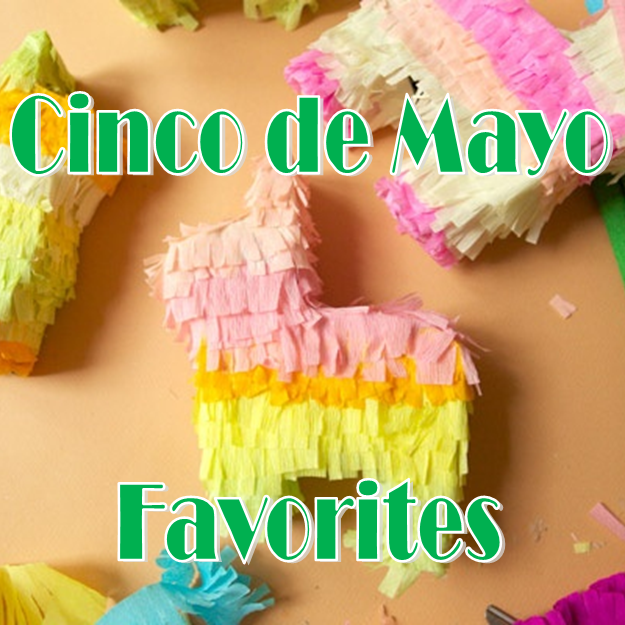
And of course if you really want to get into the Cinco de Mayo spirit, you can always go for the best dressed and make your own pinata costume. I'm not going to guarantee it, but you probably won't have to pay for a single drink all night if you show up to celebrate wearing a pinata costume. How are you planning on celebrating Cinco de Mayo on Monday?xoxo Megan You might also like these other Cinco de Mayo ideas...
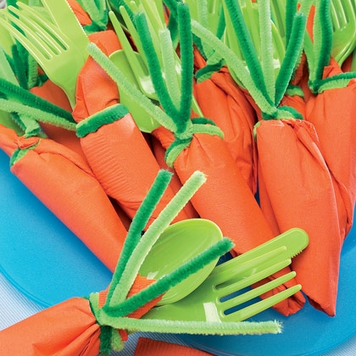
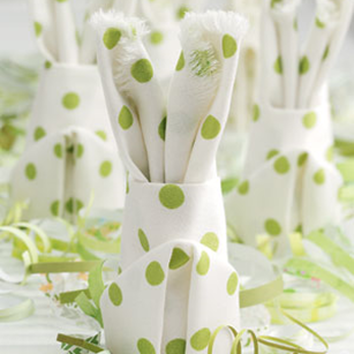
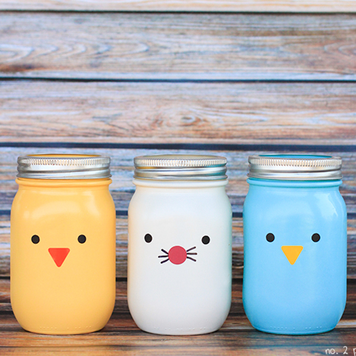
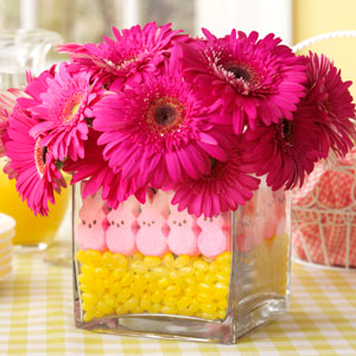
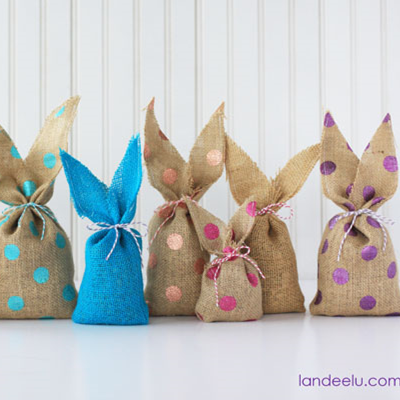
Before every holiday season I love finding new decorating ideas and crafts for me to tackle (well try) before the holiday actually arrives, and Easter is no exception! Last year I shared with you some great Easter party and egg decorating ideas that will keep me busy for quite a few years. I'm thinking this year I might try out the sharpie eggs, but we shall see! While I may have a Pinterest board just bursting with great Easter themed recipes, crafts, decorations and more, today I thought I would share with you some great ways that you could decorate your table for Easter. I can't wait to try some of these ideas out! Carrot Silverware SetIf your family is one to host Easter outside or if you are serving food at an egg hunt this is a great idea to try out this year! Spoonful provides a great step-by-step tutorial on how to wrap your utensils to turn them into these Easter carrots. Display your carrots in an adorable basket and you are ready for lunch! Bunny NapkinAnd for those dining inside on Easter these bunny napkins from Taste of Home are the perfect table accessory! I loved making origami when I was younger and napkin folding is no different. These bunny napkins are the perfect accessory for your plate or you could create a springtime centerpiece with the napkins, paper streamers and confetti. Easter Mason JarsThere are no shortages of holiday craft ideas that use mason jars. (I feel like I need to start stock piling mason jars ASAP.) When I saw these bunny and chick mason jars from blogger Number 2 Pencil I thought they would make the cutest Easter table centerpiece! She used spray paint and vinyl adhesive to decorate the jars but you could also use regular craft paint and sharpies to create your own Easter animals. Don't forget to fill them with Easter treats! Peeps Floral CenterpieceThis is another great Easter table decoration idea from Taste of Home: a peeps floral centerpiece. They provide you with a simple, 4-step tutorial on how to create this yummy Easter floral centerpiece. And of course you can use any kind of vase, candy and flowers you want when you create your own peep centerpiece. I think tulips with coordinating peeps and jelly beans would look great out on the Easter table. Burlap Easter BunniesThese bunny bags from blogger Landeelu would made the most adorable Easter table display. She provides awesome pictures and directions on how to turn a piece of burlap into springtime Easter bunnies. While I don't own a sewing machine I think that these would still be easy enough to make by hand sewing them. You can fill them with beans, rice, corn or yummy Easter treats.
How do you plan on decorating your table this Easter?xoxo Megan You might also like...
This has been one crazy week as I have been getting ready for two big events at work this weekend. Even with all the craziness I cannot wait for Sunday to get here (besides the fact that I will finally get some much needed rest) as it is Super Bowl Sunday!!! I love watching all the new ad's, dancing along to the half time performance, enjoying some delicious tailgate/football food one last time, oh and watching a little bit of the game (but that is totally optional). While I am still figuring out what I want to make for this year's Super Bowl festivities I did find some adorable (and easy) crafts that you can put together and have ready for Sunday's festivities. Enjoy!
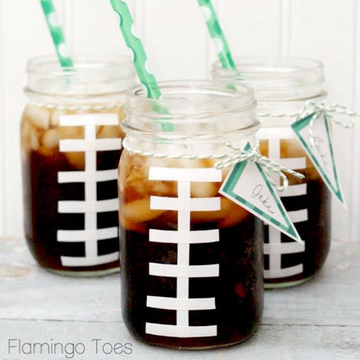
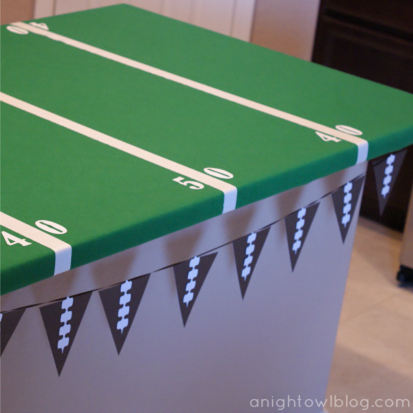
Football Mason Jars If you grew up in the south mason jars are a staple in your house hold and used for everything from canning to vases and glassware to workshop jars. This Sunday pull out those jars (wash them) and grab a roll of white electrical or washi tape to turn your jars into footballs like blogger Flamingo Toes did. At the end of the evening you can pull off the tape and add this to the list of why mason jars are the best. Football CoastersAnd while you are making your football mason jars don't forget that its a must to have coasters to go with them! These burlap football coasters, created by Stitched by Crystal, are the perfect solution! They take just minutes to make and can event be customized with your team's colors if you so desire. For the complete step-by-step instructions head on over to Snap Creativity. Football Field Buffet TableAnd last, but not least, here is a fun way to get your buffet table ready for the big game. With green felt, white duck tape and white vinyl you can turn your party buffet into your own football field like blogger A Night Owl did. Check out her easy how-to instructions on her blog and get your table ready for its own party kickoff. For an extra touch you can make your own football banner from the leftover duck tape, curling ribbon and brown construction paper.
Are you making something fun for this year's Super Bowl? Good luck to all the Seahawk and Broncos fans this weekend! Who are you cheering for this year? xoxo Megan You might also like...
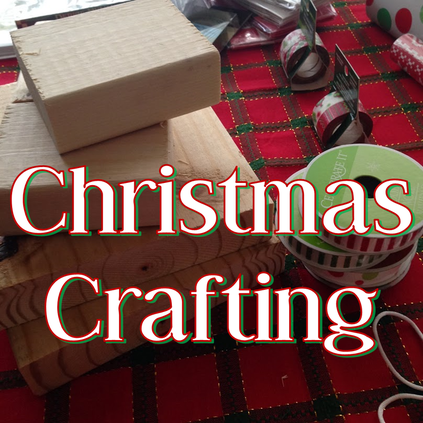
'Tis the season for holiday cheer and crafting too! This year I was really inspired by a few different projects on Pinterest and when I went to the Richmond Bizarre Bazaar and cannot wait to finish them and put them on display this holiday season! The great thing about all these craft projects is that you can make each one for under $10! What could be better than that! All your holiday guests this year will be wondering where you bought your decorations and you can stun them all when you let them know that they were made by you! Here are three holiday decorations that I will have out this holiday season!
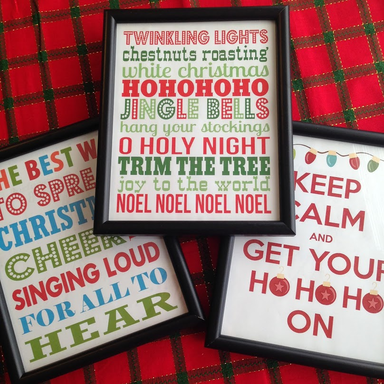
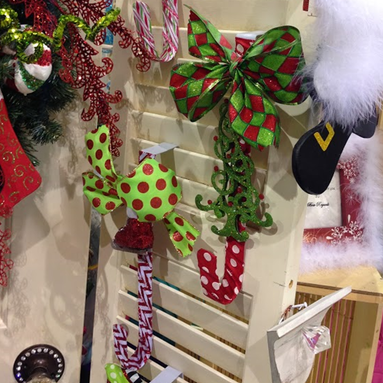
Christmas Wall Art I shared a sneak peak of this craft with you all on Monday's Christmas Bliss post. I had these 8x10' frames sitting around my apartment so I finally decided to do something with them last week. I found some great holiday prints on Pinterest, printed them on card stock paper and hung them up to enjoy during the holiday season. Since I don't have a lot of storage space these are great to enjoy now and then I can put other holiday or season prints in the frames throughout the rest of the year to enjoy. Christmas Wreath HangersThis craft was one that I was obsessing over when I saw it at the Bizarre Bazaar last weekend. The person who made these had simple wreath hangers (which I found one for $2 at BigLots) just covered in holiday ribbon with a bow and ornament attached at the top. Since I had just bought a wreath hanger a few weeks ago I thought that this would be the perfect way to dress it up for the holiday season. Now I just have to pick out which ribbon I want use from my ribbon drawer.
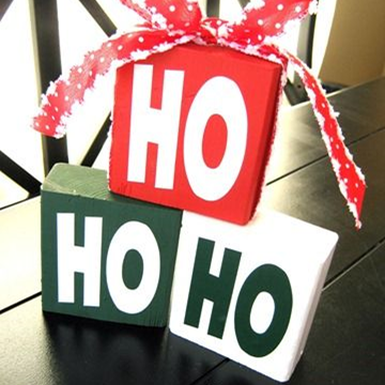
"HO, HO, HO" Blocks This craft I found on Ginger Snap Crafts and cannot wait to finish mine up! To make these adorable blocks I went to Home Depot and asked if they had any scrap 2x4" pieces of wood that I could use for a craft project and they even cut the pieces for me! (I had each block cut approximately 5" tall.) Right now I am waiting on my vinyl decals to be mailed to me and then I can put everything together. I already had some adorable Christmas ribbon in my ribbon drawer and plenty of red, green and white paint. Next decision: where to display them? Which Christmas craft is your favorite? Let me know if you are going to make any of these Christmas Holiday crafts this year and share your final results with me in the comments section below! I would love to see what everyone comes up with! xoxo Megan You might also like...
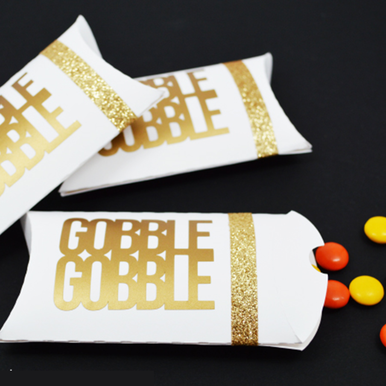
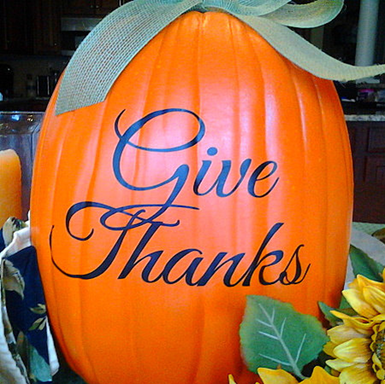
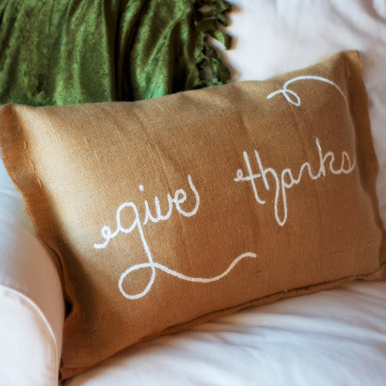
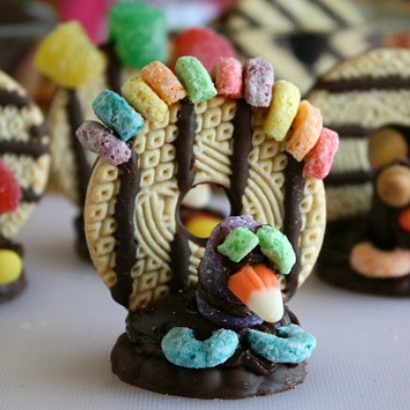
Thanksgiving is just 1 week away so it is time to kick it into high gear so that you still have time to get that pumpkin pie made for Thanksgiving day! Before the food goes into the oven and the guest start knocking at your door, it's time to work on your Thanksgiving crafting skills. Here are three great Thanksgiving craft ideas that will not only have your home ready for a day of Thanks but also give your guests something cute to take with them. (You can start worrying about the menu tomorrow.) Gobble Gobble Treat BoxesThese sparkly treat boxes are the perfect table accessories. You could add each guest's name to the opposite side of the box to act as a place card and then they can take them home to enjoy after they have indulged in your delicious pumpkin pie. You can put your own decorative spin on these Thanksgiving pillow boxes or decorate them exactly how this glitter enthusiast did by following the directions by blogger Artsy-Fartsy Mama. "Give Thanks" Vinyl DecalsTo say that I am obsessed with vinyl stickers might be an understatement. They make monogramming and decorating easy as 1-2-3 and allow you to personalize just about anything! Which is why they are great to use when decorating for the holidays. You can do one large cutout like this one from WeSpeakVinyl (one of my favorite Etsy shops!) or get individual vinyl letters for glasses, bottles or candles. The possibilities really are endless when it comes to decorating with vinyl! "Give Thanks" Burlap PillowAnd how adorable would this be in your living room where your guests will be lounge while they are munching on appetizers. I found this "Give Thanks" pillow DIY on Tattered to Taylored a few weeks ago and am currently on a mission to make my own. This is such a simple craft project as it doesn't require any advanced sewing skills (which is perfect for me!) and is easy to customize with any saying. Which Thanksgiving craft are you going to make for this year's celebrations? Share your favorite or another great Thanksgiving crafting idea in the comments section below!
xoxo
Megan
For more Thanksgiving inspiration you might also like...
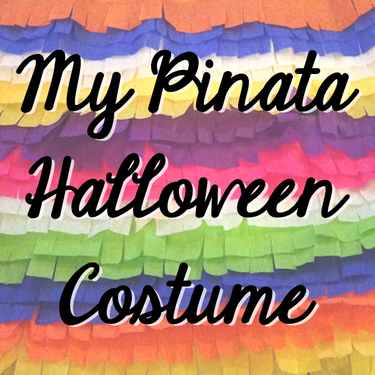
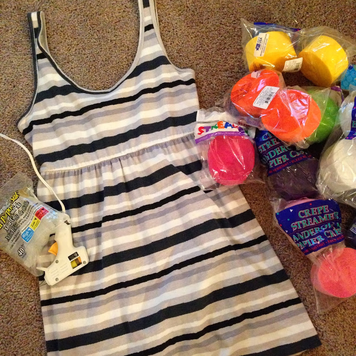
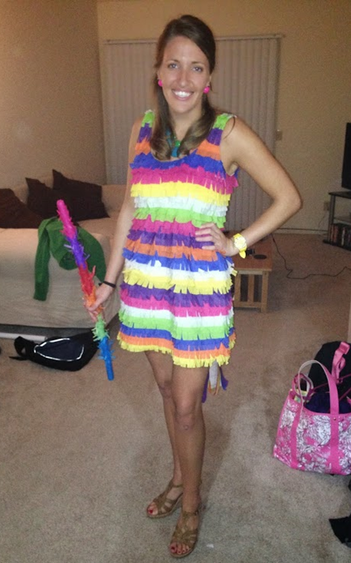
Happy Monday! As promised today I have my step-by-step tutorial on how I created my pinata Halloween costume that I wore this year. About a week or two before Halloween I spent hours on Pinterest trying to find an idea for a costume. Being the crafter that I am I really wanted to make my costume instead of buying it. So when I came across a picture of a cute pinata dress I was determined to figure out how to make my own version of the costume. Here is how I made this year's Halloween costume creation... Here is what you will need:- 1 dress or slip (I bought mine from the local Goodwill store for $4)
- 6 to 8 rolls of streamers (I bought all of mine for $1 at the Dollar Store)
- hot glue gun & glue sticks
- scissors
- large piece of cardboard
Instructions:
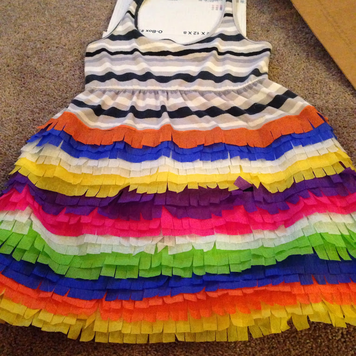
1. Before I began my project I had to hem the dress to the length that I wanted the dress to be. I used no-sew hemming tape and an iron and had my dress ready to go in about 5-10 minutes.
2. Once I had my dress at the correct length I cut my streamers so that each piece would wrap all the way around the dress one time each. To prevent the streamers from ripping I didn't cut the slits in each streamer piece until I was ready to glue it onto the dress.
3. When you are ready to glue on your first streamer take a piece of cardboard and stretch the dress over it. This will prevent the dress from sticking to itself on the inside.
4. Starting from the bottom of the dress and working up, glue your strips of streamers onto the dress using the hot glue gun. In no organized order I glued two strips of each color onto the dress at a time. It was just an added perk that the dress I found was striped and provided excellent guidelines. 5. To help prevent an visible seam I started and ended each streamer in the middle on the back.
6. When I got up to the arms and dress collar I glued on the streamers like normal and then folded over any extras and glued it to the inside of the dress.
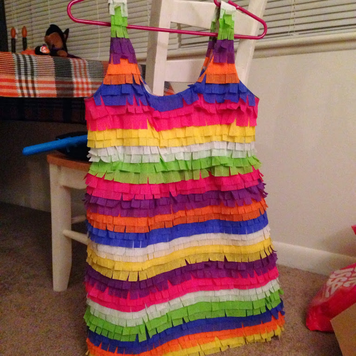
7. As a final touch I added a pinata tail by cutting 1 long strip of each color, tied them together and then glued it to the back of the dress. To finish the look I wore bright colored jewelry, carried a pinata stick and had a purse filled with candy to hand out at the party. This was such a fun costume to wear! Everyone I saw that night loved my costume and could not believe that I had made it. (Handing out candy also helped a little too!) My only worry with this costume was that all the streamers were going to fall off after once use, so it was a great surprise when I got home that night and the costume was still in great shape. What did you dress up as for Halloween? Did you try a DIY idea this year like I did?
xoxo
Megan
You might also like...
Just like with Christmas, and every other major holiday, I always have a great vision of making tons of cute decorations to display in celebration. So every year I have my list (aka Pinterest board) of what I want to make and then a week before the holiday finally make at least one of the items. Well this year I am on a mission to try and create a few more Halloween decorations and decided that if I share my crafting to-do list with you some of these might actually get completed! (I have some high hopes for this year!) So without further ado, here are three Halloween party crafts that I am determined to make before the end of the month.
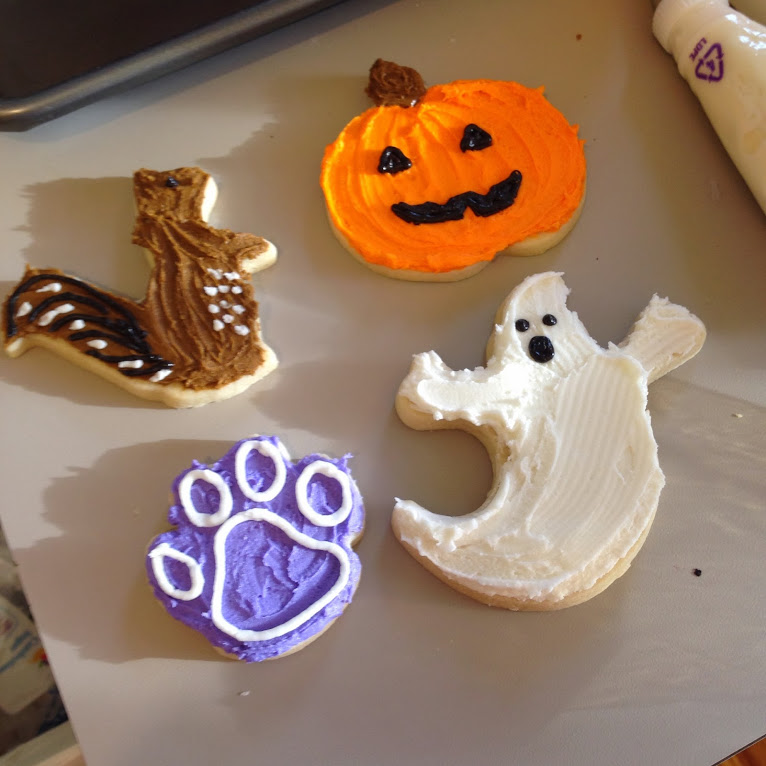
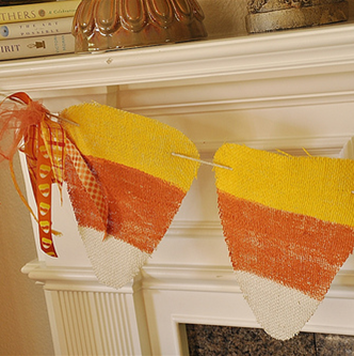
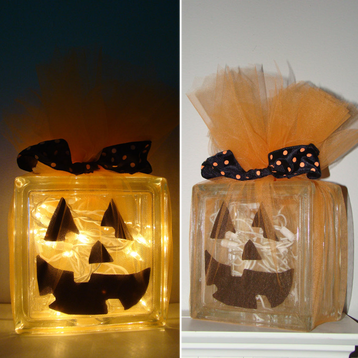
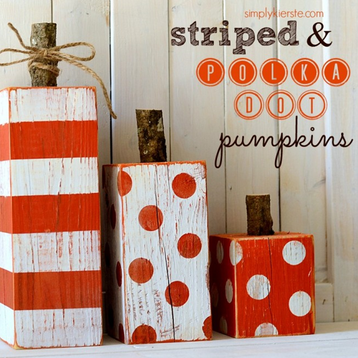
Candy Corn Banner from Your Homebased MomThis is the perfect holiday and party decoration item and is super easy to make! Each candy corn was cut out of a sheet of burlap and then painted using sponge brushes. Once they were dry a piece of twine was threaded through the burlap pieces to create the adorable banner. For the finishing touch they added some adorable ribbon to each end of the banner. If you are like me this is the perfect solution for all those short pieces of ribbon that are sitting in your ribbon box. Block Light Pumpkin from Etsy store VinylSigns4HimThis light up pumpkin is a great craft for those that don't have a front porch for a pumpkin or want an adorable light up party centerpiece. To make this light up pumpkin you will need orange tulle, ribbon, a string of twinkle lights, a glass block and either black paint or black vinyl to make the pumpkin's face. Even when the pumpkin lights are not turned on it is still the perfect decoration to put on display for the holiday season! Decorative Wooden Pumpkins from Simply KiersteBecause everything has to be decorated with stripes, polka dots or chevron these are the perfect Halloween decoration for this year. These are a little more complicated to make and you can find a great tutorial on how Kierste made these on here blog here. This is the one craft that I would love to make but not sure I will actually get around to it since it requires the use of a saw. However the nice people at Lowe's are always happy to help! I can't wait to add some a few more Halloween decorations to my Lilly Pulitzer pumpkin I created last year! (picture at the top) Do you have any Halloween crafts that you plan on creating? Make sure to share your crafting ideas in the comments section below! Only 28 more days until Halloween! xoxo Megan You might also like...
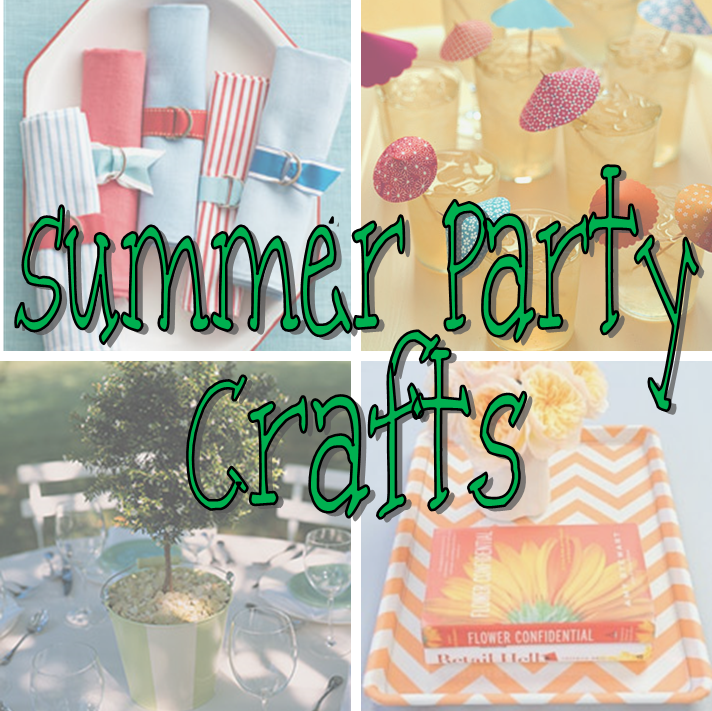
I cannot wait for all the summertime parties and events to get started! No matter if it is a pool party or a night under the stars in your own backyard you can’t go wrong with these party essentials. As always the amazing Martha Stewart knows what to do when it comes to party crafting. I have four DIY crafting ideas that will prepare you for any summertime get together. So grab your crafting essentials and get ready to craft your way to a summer of fun! 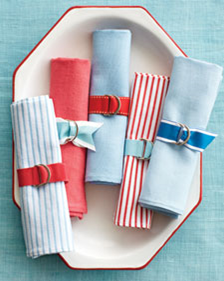 Preppy Napkin RingsMaterials:Stitched grosgrain Imported Chromspun grosgrain Nickel D rings, 1 inch wide Fabric glue Instructions:Step 1: Cut 9-inch lengths of grosgrain ribbon or twill tape. Notch 1 end, or cut it at an angle. Loop the other end through 2 D rings, wrapping ribbon around the rings' straight edges, and glue it to itself with fabric glue. Step 2: Center a rolled napkin on the ribbon; thread the ribbon's free end through the rings as you would a belt, and pull it snug.
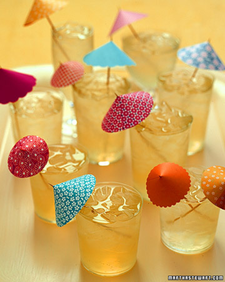 Drink UmbrellasMaterials:Paper Pinking shears or scallop scissors Glue stick or double-sided tape Craft glue Wooden skewer Scissors Instructions:Step 1: Cut paper with pinking shears or scallop scissors for a decorative edge. Step 2: From each circle, remove a pie-slice shape measuring about 1/8 of the circumference. Fashion into a cone, slightly overlapping straight ends; use a glue stick or double-sided tape to secure. Step 3: Dab white craft glue inside nose of cone, and pierce tip with a wooden skewer (snip skewer for a custom fit); allow to dry.
 Metal Bucket CenterpieceMaterials:Metal beach buckets Sandpaper Primer Water-based enamel paint Masking tape or stencils Pencil Instructions:Step 1: Sand and prime each bucket, then coat with water-based enamel; let dry overnight. Step 2: Once dried decorate with stripes, dots or other fun summertime pattern. Step 3: Fill the buckets with plants, souvenirs, shells or other summertime goody to complete your centerpiece.
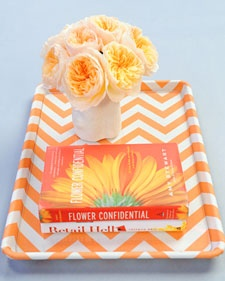 Decorative Tray Materials: 1 yard decorative fabric Aluminum rimmed baking sheet Spray adhesive Scissors Fabric glue Synthetic felt 1/4-inch-thick acrylic sheet cut to fit inside of tray Instructions: Step 1: Cut fabric large enough to cover the front and wrap around the back of the baking tray. Cover the front of the tray with spray adhesive. Step 2: Place fabric on tray so pattern is aligned, leaving enough room to wrap fabric around all sides to the back. Smooth fabric onto tray, pressing out any bubbles. Step 3: Pull any extra material into corner and push around the edge. Turn tray over. Cover the back of the tray with spray adhesive. Step 4: Press the fabric over two edges of the tray first, then fold in on each remaining side, as if wrapping a gift. Trim any excess fabric with scissors. Use fabric glue to secure, if needed. Step 5: Cut a piece of felt to fit the back of the tray and conceal fabric edges. Smooth felt on the back the tray. Step 6: Place acrylic sheet in center of tray.
Now you are ready for any celebration that may come your way this summer! Do you have any other great DIY ideas that would be great for a summer party? Share your ideas below!
xoxo
Megan
You might also like…
|


 RSS Feed